Choosing Your Scarf

This is a chance to up-cycle that old winter scarf that you haven’t worn in years, or you can get out the sewing machine and whip up one just for this project. It all depends on what you have on hand and what you are already comfortable doing. A scarf is after all, just a long rectangular piece fabric.
Drawing the Circuit
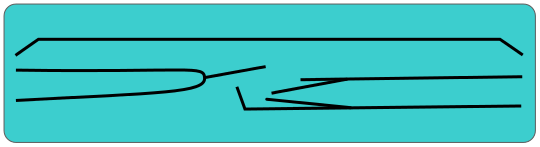
If you lay out the scarf on a table or clean floor, it’s best to think of the circuit as starting from the left and going to the right. You will eventually connect your phone or music player to the left side of the scarf and your headphones to the right side.
The first step is to draw your circuit so you know where to sew. It’s best to use something that easily washes out like tailors chalk. Though if you are going to completely cover the sewn conductive thread so it won’t be seen, then that’s less important.
If you are going to use a sewing machine, keep in mind that the conductive thread will be in the bobbin, so it will be sewn on the underside of the fabric. You will want to draw your circuit on the opposite side that you will sewing your conductive thread. If you are sewing by hand, then you can trace on either side of the fabric.
- Draw the following pattern onto your scarf.